Technique Detail
-
Setup
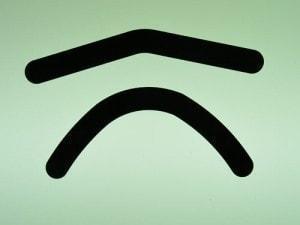
01. Greater Curve vs. Standard Tofflemire
At the top is a standard tofflemire band.
At the bottom is a Greater Curve tofflemire band.
You will see that this technique of restoring teeth takes advantage of the peculiar properties unique to composite.
-
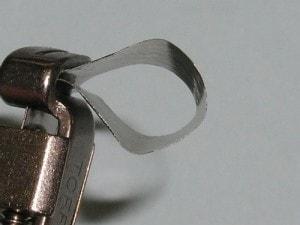
02. Band setup
To prepare the tofflemire retainer to receive the band, turn the long knob to move the locking vise all the way down to the head of the retainer. Then turn the short knob to loosen the retaining screw (the retaining screw should disengage from the sliding body).
Fold the matrix band to form a loop. Set up the band opening just larger than the circumference of the tooth.
This will keep the band within the prongs of the tofflemire retainer as the matrix is tightened. Set up the band with the tails down in the vise. This set up further helps keep the band within the retainer.
-

03. Tighten band
Turn the long knob of the retainer. This will pull the matrix band along with the sliding body, thus decreasing the diameter of the matrix band and tightening it around the cervical portion of the tooth, providing a great seal.
-
Prep
04. Bend the band against the marginal ridges of the adjacent teeth
Burnish the metal precisely at the contact position with a condenser.
If necessary, prior to placing the band, make certain the opposing contact has a flat surface. If it does not have one, make one. A marble to marble final contact, even if tight, is still a food impaction site.

-
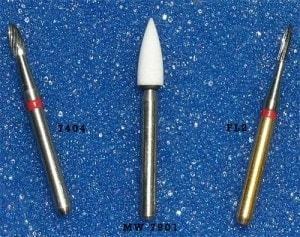
05. Finishing burs
These are the shape of finishing burs you will need. I prefer Brasseler brand.
The 7404 small football is the first choice.
If the space is really tight, reach for the flame shaped MW 7901.
Many find that Shofu's FL2 White Stone works well.
-
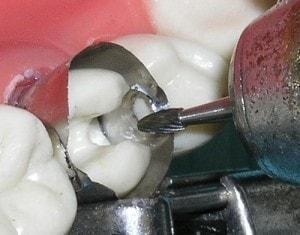
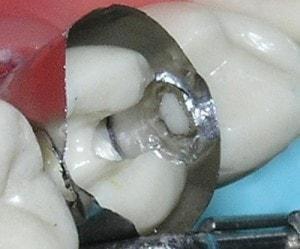
06. Plane away the matrix at the contact position
Do not use water spray and go easy on the rheostat.
Just barely remove metal - Keep the RPMs low with the bur against the matrix the entire time and do not lift the bur.
It is a "rubbing, smoothing" side-to-side motion. Once you have perforated metal, expand the opening around the periphery until you have arrived at the desired contact size, both buccal-lingual and cervical-occlusal. Do not be heavy handed. Magnification makes this easy.
-
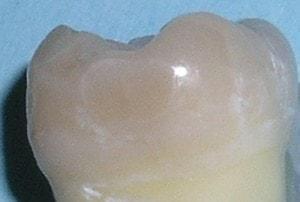
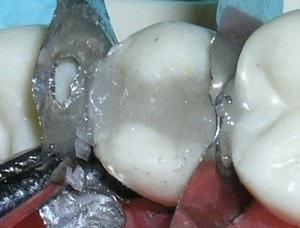
07A. Shape the contact
Shape the contact to match the contact surfaces of the contiguous tooth. Pictured is a third molar removed from a 33 year old patient.
You will duplicate this with your composite. You have the ability to shape the contact to any size desired.Note how nature over time creates a broad oval contact.
-
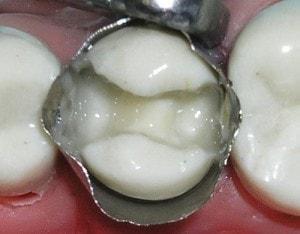
07B. Assure the metal feathers against the adjacent tooth
Assure the metal feathers against the adjacent tooth without gaps around the periphery.
The circumference of the opening is guided by the flatness of the adjacent tooth's contact surface.
The opening does not need to be large.
-
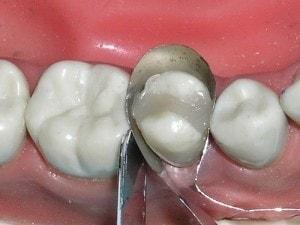
08. Place the flowable composite
After placing the bonding agent of your choice, place a flowable composite. Curing the flowable composite will lock everything in place, and assure the deeper parts of the prep are sealed and bubble free.
Only place flowable composite into the deeper crevices and sides of the proximal box. Keep it thin. Remember, flowable composite has excessive polymerizing shrinkage.
After placing the flowable composite, fill the remainder of the prep with composite.
-
Band Removal
09. There is no need to place a separating agent at the contact areas
Any bonded contact to the adjacent tooth can be broken cleanly with the blade of a small mixing spatula.
Tell your patient they will hear a little snap as you lightly torque the spatula.
-
10. Slide band out of contact area
If the band does not slide out easily, twist the band side to side, with hemostats. It will sever at the contact position due to the prior burnishing.
-
Completed Composite
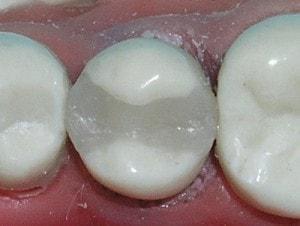
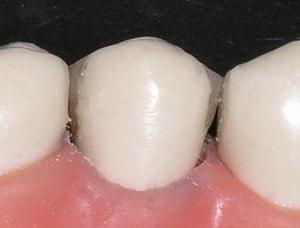
10A. Finish as normal
Finish out the composite and adjust occlusion as normal.
-
10B.
Contacts will have width and depth, and will be very tight and smooth.
-
Additional Information
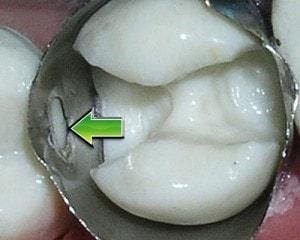
Sealing the contact opening
In the case of a contact opening not sealing perfectly against the neighboring tooth, use a condenser to hold the matrix band against the neighboring tooth at the base of the contact area, and above the first increment of flowable composite.
The thinned metal is very malleable and easy to hold in position while curing.
Arrow shows the position for the condenser.
-

Wedging
Wedging is rarely needed.
If there is a need to secure the matrix against the cervical portion of the prep, lightly place a wedge.
Trim the belly of the wedge so it does not distort the matrix band.


Uncomfortable making openings in the matrix?
Use separating springs with the Greater Curve matrix. The band's outward flare places it directly against the adjacent teeth. We recommend thinning the band with a composite finishing bur at the contact position. Thinning will make the matrix malleable and adaptable to the adjacent tooth. Thinning will also acquaint you with the exercise of "smoothing in" contact openings.
Connect